


In my previous article I had discussed How to create a basic Facebook Ad, taking the example of a coaching center. Now, once your ad is up and running on Facebook, you sure want to measure your return on investment, don’t you? In this post, I will discuss how a marketer/small business owner can measure his Facebook ad performance using Facebook’s Conversion tracking tool.
What is Facebook Conversion Tracking Tool?
Early this year, Facebook introduced their conversion tracking tool to help advertisers measure the return on investment of their Facebook ads. In simple words, you can see when an ad displayed on Facebook leads to a sale or an action that you wanted your user to take. For example: when someone registers/redeems a coupon/ shares your page post/ adds to cart/ checkout your ad etc.
The idea of conversion tracking can be explained in three simple steps:
Step 1: Create a conversion tracking pixel – a javascript code snippet (don’t worry, you don’t actually need to create it; Facebook would do it for you)
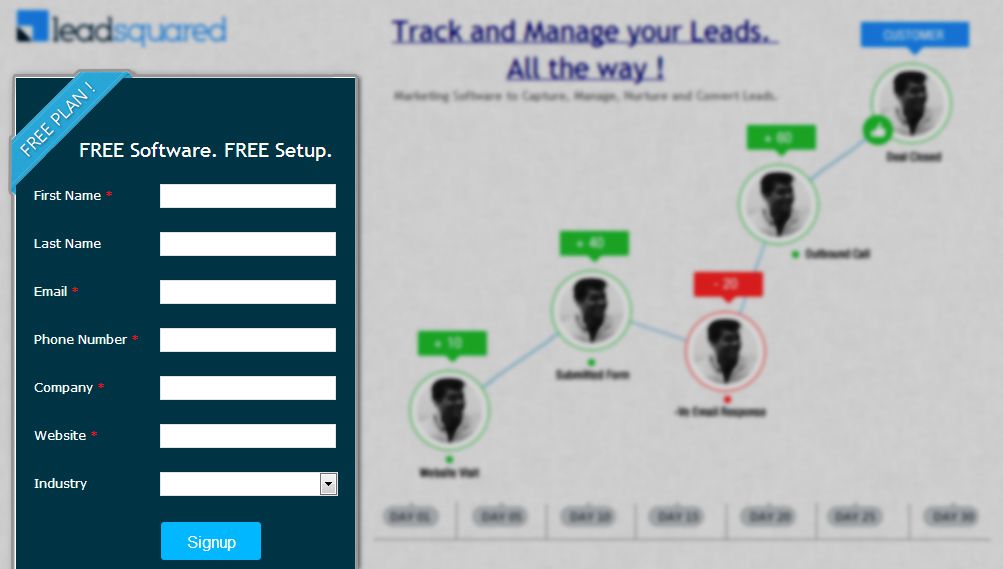
Step 2: Identify/Create your Check out page: Add this pixel to the page where conversions will happen. (For example: When a user fills the form on LeadSquared’s landing page (image shown below) they are redirected to a Thank You page (shown below the landing page image).
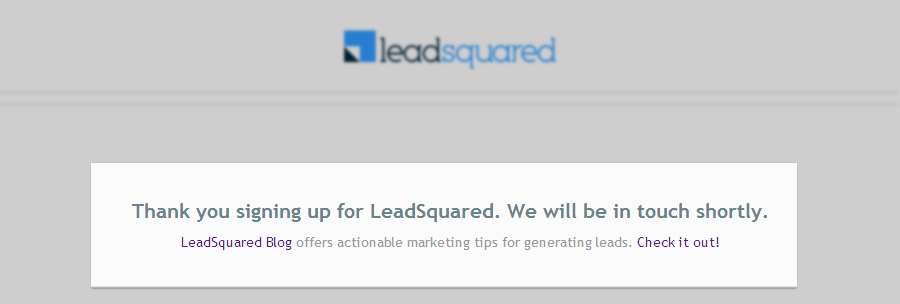
Step 3: Place the Conversion Pixel on the Page: Since our main objective is to keep count of the conversions, i.e people who have filled in the registration form, we have created this pixel (shown in image) and added to the ‘Thank You’ page mentioned in Step 2.
**Terms mentioned above might sound a bit technical for a first timer. Don’t worry, I will break it down into simple steps and explain each one in detail.**
How does Facebook Conversion Tracking work?
1. When a Facebook user loads a page with the code on it, the code lets Facebook know that the conversion process has occurred. In the example above, as the Thank You page loads only after a visitor has submitted his/her details, the tracking pixel on it would notify Facebook of a conversion, every time it loads.
2. Facebook then matches the conversion with the set of visitors who have already viewed or clicked on your ad.
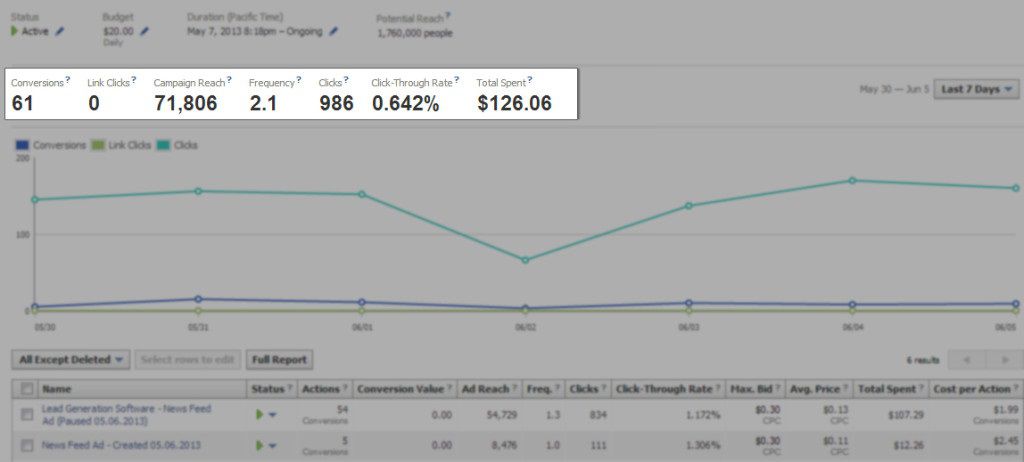
3. After this, the ‘Ad Manager’ gives the final report on ad clicks. See the image below.
Here is a quick tip: It is advisable that you create the pixel code of your ad which will help you track conversion before creating your Facebook ad.
Step-by-Step guide to Facebook Conversion Tracking:
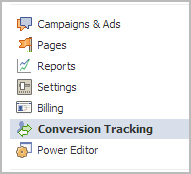
Step 1: Once you log in to your ‘Ads Manager’ tab, click on the Conversion Tracking button on the left side bar.
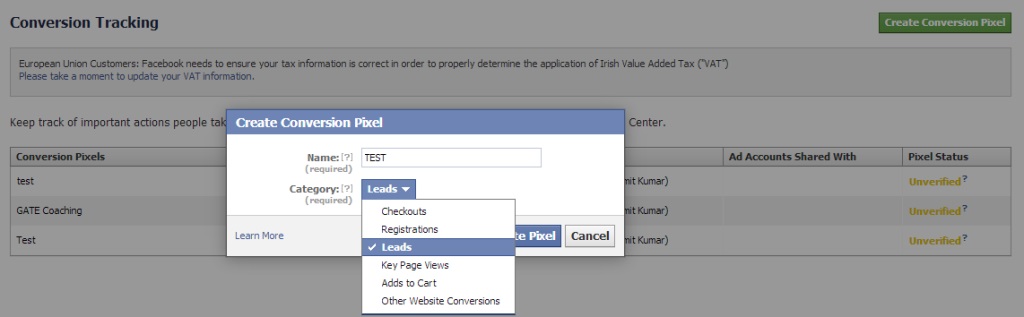
Step 2: Then click on the ‘Create Conversion Pixel’ tab to begin the process.
Step 3: You will be directed to this pop-up, which will ask you for a:
1. Name: An appropriate name will help you remember what you are tracking. (Example: Lead Generation – GATE Ad)
2. Category: This will help you decide the type of action that you want to track on your site. You can choose from the following:
1. Checkouts
2. Registrations
3. Leads
4. Key Page Views
5. Adds to Cart
6. Other Website Conversions
(For the purpose of this example, we have selected ‘Leads’).
Step 4: You will be able to see a pop-up window with a JavaScript code. This is the code that you will have to add to the page where the conversion will happen. This will let you track the conversions back to ads which you are running on Facebook.
Here is the tricky part. The code should not go on all pages. For that matter, it should not even go to the landing page of your product. The code should be placed on the page that a user will finally see when the transaction is complete.
For Example: If you want to track when students register for your GATE coaching, paste the code on the registration confirmation page/thank you page and not on the form that they need to submit.
How do you confirm that your conversion is working properly?
Check that the javascript snippet has been placed on the correct conversion page. Visit the page where the pixel has been embedded, right click and go to ‘View Page Source’ to find the pixel. The code should have the tag of the HTML. See image below.
Check that Facebook is receiving the conversion events from your website. Go to the conversion tracking tab in your Ads Manager account. There you will see a list of the conversion tracking pixels that you have created. If the conversion tracking pixel has been successfully implemented and a conversion event has been recorded, it will be reflected in the Pixel Status column. If the status shows active, it means that the page which contains the pixel has been viewed by users. If it shows inactive, it means that over the last 24 hours, the page with the pixel has not been viewed.
Conversion tracking
Keep track of important actions people take on your website after the view or click on your ads.
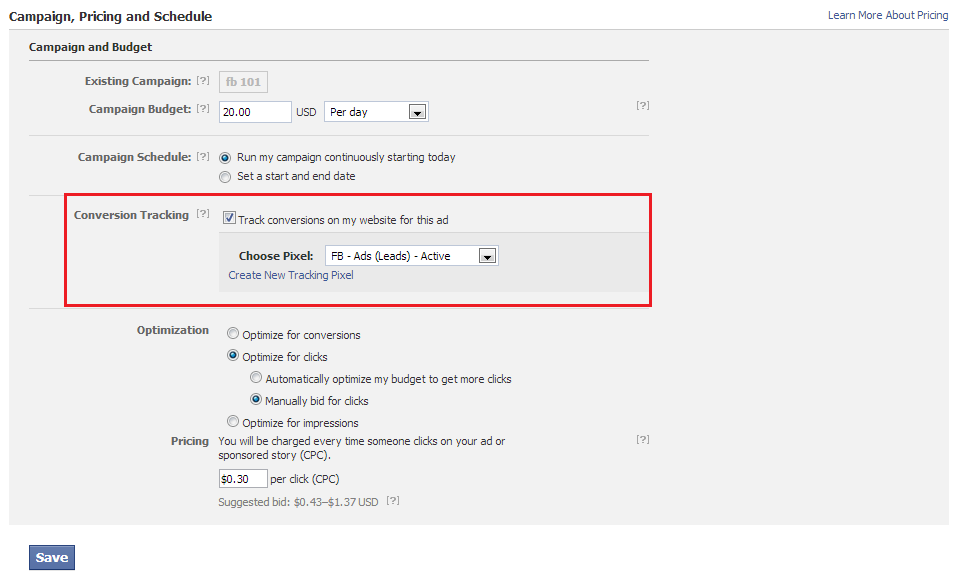
Later, when you create your Facebook ad, you need to check the track conversions box under the campaign, pricing and schedule tab to enable tracking.
A word of caution here: If you delete the Pixel Code, you will lose all activities related to that particular ad. You will have to create the pixel and then an ad all over again.


