


MARKETING
Google Adwords Call Extensions Setup Guide
Contents

Google Adwords Call Extensions have become quite popular recently. It enables your visitor to contact you directly, with just one click (instead of filling up a form and waiting for your representatives to give a call back) and that is probably the sole reason why it is being used more than any other ad extension; and that is why we also use it in our Adwords campaigns.
Google Adwords Call extensions vary depending on the type of devices your viewers are using. Like, for:
You may read about more of its features and benefits on my previous blog post- Google Adwords Ad Extensions Benefits.
For now, let’s discuss about the two types of Call Extensions.
Now that you know about the types of Call Extensions, let’s discuss the:
Steps to add Legacy Call Extensions
Step 1 | Login into your Adwords account |
Step 2 | Select the Campaign you would like to call extensions |
Step 3 | Click on the Ad Extension tab |
Step 4 | In the drop down menu “View”, select Call Extensions 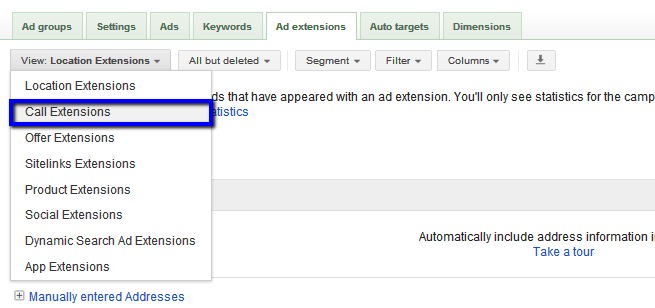 |
Step 5 | Click on +New Extension 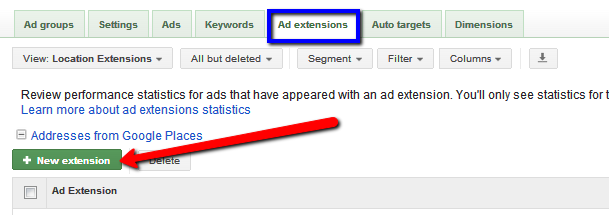 |
Step 6 | Choose which type of call extension you would want o enable: Google Forwarding Number or your own Business Number |
Step 7 | Choose whether to put both your business phone number and your website; or just your phone number 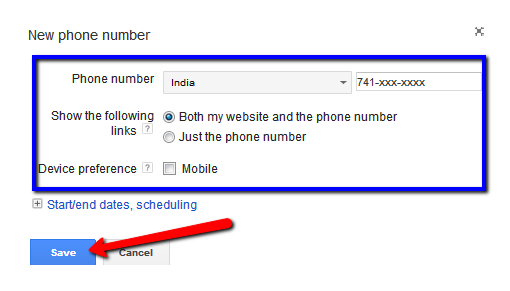 |
Step 8 | Enter your phone number and your country. You can edit the number whenever you wish. |
Step 9 | Click Save |
| Note: You can add upto 20 Call extension to an ad campaign or ad group. |
Step to add Upgraded Call Extensions
Step 1 | Login into your Adwords account |
Step 2 | Select the Campaign you would like to call extensions. Make sure you choose an Enhanced ad campaign only. |
Step 3 | Click on the Ad Extension tab |
Step 4 | In the drop down menu “View”, select Call Extensions. 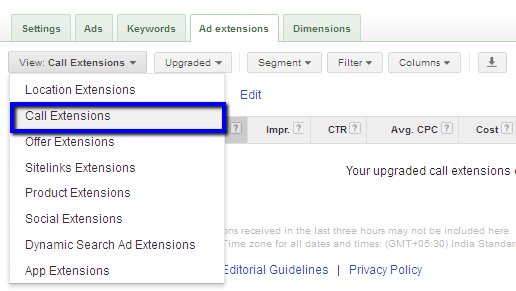 Then select Upgrade from the adjacent menu. |
Step 5 | Click Edit, next to Call Extension Settings. |
Step 6 | In the form that appears, you’ll see a picker with phone numbers (both legacy and upgraded) that you previously set up. You can either select one of these extensions or create a new one 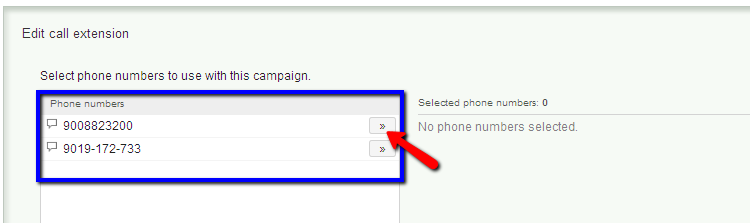
|
Step 7 | Enter your phone number and your country. You can edit the number whenever you wish. |
Step 8 | Choose which type of phone number you’ll use for your call extension: 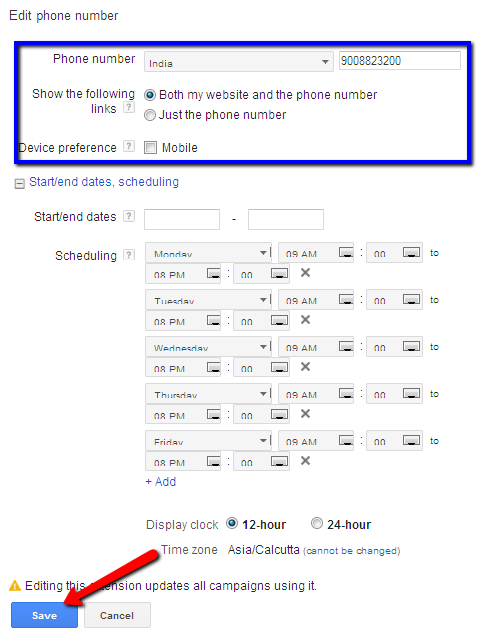
With upgraded extensions, your own phone number can appear on all devices, whereas |
Step 9 | Choose whether to put both your business phone number and your website; or just your phone number |
Step 10 | Specify how long a call should be for it to be reported as a conversion. Calls longer than the duration you specified will be reported as a conversion in the “Phone call conversion” column in the Campaigns and Ad groups tab (under the Conversions menu) |
Step 11 | Click Save |
Enter your details and we'll send you a quick confirmation email to verify your address.


